How do I track button clicks with Google Tag Manager?
GTM is a good tool for viewing conversion statistics from Appvizer. Sending forms or a significant action by a prospect on your website are considered conversions.
Call the tag in the site header
First of all, you need to install the Google Tag Manager script in the header of your website so that it can be launched on all pages.
You will also need to install the general Appvizer script in the header:
<script type="text/javascript">
(function (w, d, id) {
var ts = new Date().getTime();
w.avURL = w.avURL || 'https://appvizer.one';
w.avPool = w.avPool || [];
w.avPool.push({start: ts, id: id});
w.av = function () { w.avPool.push(arguments) };
var e = document.createElement("script");
e.async = true;
e.src = w.avURL + '/ariadne/v1/ariadne.js?ts=' + ts;
d.getElementsByTagName("head")[0].appendChild(e);
})(window, document);
</script>
Identify your button
In Google Chrome, you can launch the Inspector (Ctrl-shift-I) then click on the element selector:

By then clicking on the button, the characteristics related to the button are displayed in the right panel. You have to identify a characteristic unique of the button (which is not used for another button).
This characteristic can be:
- Class
- ID
- link (link)
Activate the required variables
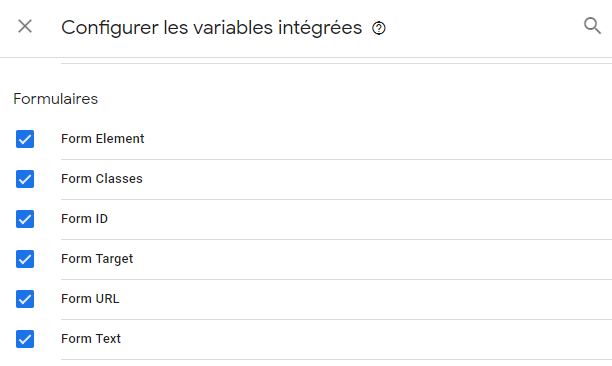
You must then ask Google Tag Manager to track variables that we need.
To do this, go to theWorkspace then in the Variables, finally in the Built-in variables and check the boxes for the items you want to watch out for.
If the button is part of a Form and that its distinctive element is a Class, check Form Classes In” Forms“. Do not check all the boxes.
Create a tag
The tag contains the script linked to the click, you must use “HTML” for the appvizer tags.
Here is the code to paste into the HTML conversion tracking tag for appvizer, replacing XXXXX with your ID.
<button onclick="av('conversion', {id: 'AP-XXXXX'});">Conversion</button>
Create the trigger linked to the tag
The trigger tells Google Tag Manager when to trigger a tag or not, based on visitors' actions.
To create the trigger, use the Plus (+) blue at the top right of the page.
Name the trigger (for example) “Newsletter click.” Then click on” All the elements ” in the section” Clicks ”.
Change the trigger to limit it to only certain clicks. So choose “some clicks” then (for example) Form Classes/equals/newsletter-form-button if that is indeed the name of the class identified in 1.

If you found another type of identifier (class...) in phase 1, you will have to choose the right variable in the first box instead of Form Classes.
Then save the trigger and then the tag.
Check the operation
To do this, click on” Preview ” in the top right corner of GTM.
Once the preview window is displayed, hold down the CTRL key (or Command on Mac) and click the button. You will be able to visualize the tag (s) that are triggered during this action in the GTM debugging window.
Once the check is complete, you must publish the container in order to make it functional.