Buttons click Tracking with Google Tag Manager is useful, for instance to count conversions. Conversions correspond with the filling of a form or with a significant prospect’s action on your website.
Summary
- Install the tag in the Header of the site
- Identify your button
- Activate the necessary variables
- Create a tag
- Create the trigger linked to the tag
- Check the operation
Install the tag in the Header of the site
First, you need to install the Google Tag Manager script in the header of your website so that it runs on all pages.
Also, you will need to install the general Appvizer script in the header as well:
<script type="text/javascript">

(function (w, d, id) {

var ts = new Date().getTime();

w.avURL = w.avURL || 'https://appvizer.one';

w.avPool = w.avPool || [];

w.avPool.push({start: ts, id: id});

w.av = function () { w.avPool.push(arguments) };

var e = document.createElement("script");

e.async = true;

e.src = w.avURL + '/ariadne/v1/ariadne.js?ts=' + ts;

d.getElementsByTagName("head")[0].appendChild(e);

})(window, document);

</script>
Identify your button
In Google Chrome, you can launch the inspector (CTRL-SHIFT-i) and then click on the element selector:

When you click on the button, the characteristics related to the button are displayed in the right panel. It is necessary to find a unique feature of the button (which is not used for any other button).
This characteristic can be :
- class
- ID
- link
Activate the necessary variables
Then you have to ask Google Tag Manager to follow the variables you need.
To do this, go to the Workspace, then to the Variables, then to the Integrated Variables and check the boxes of the elements to be monitored.
If the button is part of a form and its distinctive element is a Class, check Form Classes in "Forms". Do not check all the boxes.

Create a tag
The tag contains the script related to the click, you must use "HTML" for Appvizer tags.
Here is the code to paste into the Conversion tracking HTML tag for Appvizer, replacing XXXXX with your ID.
<button onclick="av('conversion', {id: 'AP-XXXXX'});">Conversion</button>
Create the trigger linked to the tag
The trigger tells Google Tag Manager, depending on the actions of visitors,
when it should or should not trigger a tag.
To create the trigger, use the blue Plus (+) at the top right of the page.
Name the trigger (e.g.) "Newsletter click". Then click on "All items" in the "Clicks" section.
Modify the trigger to limit it to certain clicks. Choose "certain clicks" and then (for example) Form Classes / equal / newsletter-form-button if this is the name of the class identified in 1.
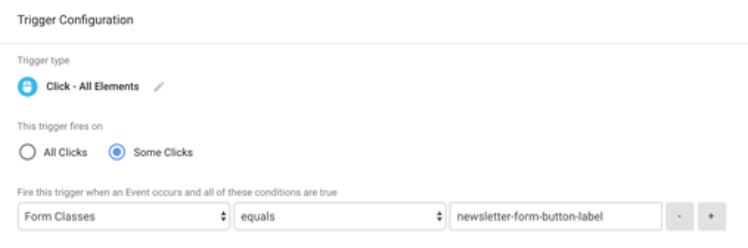
If you had found another type of identifier (class...) in phase 1, you will have to choose the right variable in the first box instead of Form Classes.
Then save the trigger, then the tag.
Check the operation
To do this, click on "Preview" in the top right corner of GTM.
Once the preview window is displayed, hold down the CTRL key (or Command key on Mac) and click on the button. You will be able to see the tag(s) that are triggered by this action in the GTM debugging window.
When the verification is done, you have to publish the container to make it functional.